
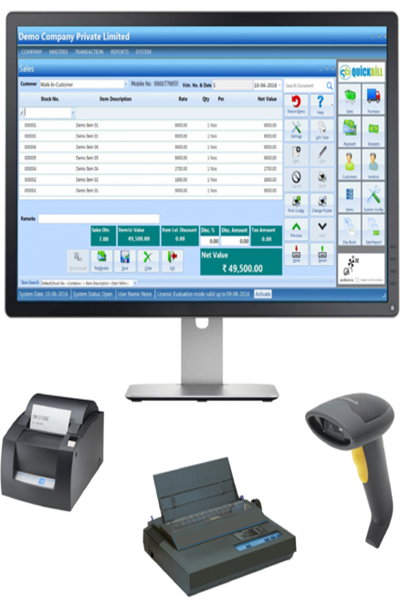
QuickBill is a business solution for small, midsize and large business operation from a single store to a large chain. It is scalable and complete solution for businesses at any stage. It provides greater control over the Inventory, POS / Trading operations along with financials. It's really quick in implementing and is simple, yet comprehensive to use with the power to support your growth plans.
Are you integrating a , and what acquisition software is being used?
The specific or calibration step you are working on
: Check the filament transformer connections, measure filament continuity, and verify filament current calibration settings. drgem x ray service manual install
error appears, it is normal for first-time installs; you must complete a full mA calibration across all kV steps. Display Adjustment:
[ High-Voltage Generator ] │ ├───► High-Voltage Cables (Anode/Cathode) ───► [ X-Ray Tube ] ├───► Low-Voltage Control Cable ───► [ Collimator ] ├───► Stator Cable ───► [ Tube Stator Motor ] ├───► Hand Switch / Foot Switch │ [ System Console PC ] ◄─── Ethernet / Fiber ─────► [ Flat Panel Detector ] High-Voltage (HV) Cable Connection Are you integrating a , and what acquisition
Use a dosimeter to confirm that the kV and mAs outputs match the values displayed on the console.
Record the calibrated kV and mA values in the installation log. Software Initialization & Service Mode
Interconnecting cables between the generator, tube support, table, detector, and workstation must be routed according to the manual’s specifications. Cable routing affects both electrical performance and mechanical safety. Excess cable lengths should be managed to prevent interference with moving parts and to maintain a professional appearance.
Connect a calibrated non-invasive X-ray multimeter to measure output accuracy. Enter the generator’s service mode via the calibration software to adjust the filament curves and high-voltage inverter gain settings. 6. Final Inspection and Handover
Mount the X-ray tube head onto the carriage. Secure all safety bolts and verify that the rotation locks engage correctly.
Wiring for X-ray I/O and DR I/O terminal blocks must match the specific tube model, such as those from Toshiba or Varex. 3. Software Initialization & Service Mode